When creating or maintaining an existing React app, do you wonder about how to make sure the code you write helps to ensure an accessible user interface? Can this even be done with React? Are there any tools to help automate this process? This may surprise you, but I’m happy to report that there is something available to help developers write more accessible code, and it comes pre-packaged with React; a utility called a “code linter.”
This article explores various ways of using React’s accessibility code linter by taking you through the process of creating a new React app! This will greatly help you learn about and explore the various ways available to use the code linter in your project.
We’ll be answering a few questions, such as:
- What is a code linter and why would I use it?
- How do I get the React accessibility linter into my project?
- What are the different ways I can use the code linter?
Before we dive in and find out about all this great info, let’s learn about why you should use a linter utility by asking the question, “what is code linter?”
What is a code linter?
A code linter is a tool, usually a plugin or extension installed in your text editor, that watches and reports bugs in your code in real-time. Linters are available for a wide variety of editors, supporting pretty much any programming language you could think of!
For example, if you’re writing HTML and forget to close a tag, or if you accidentally leave off a semicolon at the end of a line of JavaScript, the linter will let you know of these issues. Linters usually inform you of an error by underlining the code in a bright color, then displaying a message when the line of code in question has the editor cursor in focus.
The purpose of code linting is to make sure the code you write is the best quality it can be before having others on your team take a look during code review and definitely before merging the code into the master branch.
This might all sound great for checking programming language syntax, but what about when it comes to accessibility and making sure that we create usable and accessible user interfaces? Is there any sort of linter plugin available to let us know when your images are missing alt text, or if you’re using an ARIA (Accessible Rich Internet Applications) attribute incorrectly?
When making an app with React, the answer to this question is an astounding, “Yes!” Specifically, when creating a React app using the create-react-app project, the application source files will be accompanied by a code linter plugin called eslint-plugin-jsx-a11y, which is what we’ll be focusing on in this post. We’ll look at what it is and how to use the plugin to help ensure your React apps are that much more ahead when it comes to accessibility.
What is eslint-plugin-jsx-a11y?
In the simplest terms, eslint-plugin-jsx-a11y is a utility which helps you write accessible code. It’s a plugin to be used with ESLint, a very popular and well made JavaScript code linter which is supported by all the popular code editors of today.
When creating React apps, your application logic and templates are written using the JSX language, a syntax extension to JavaScript. eslint-plugin-jsx-a11y does what it can to make sure your code, specifically the JSX that you write (including template HTML) within your React app, does not contain any accessibility issues (that is, the issues it can help identify at the code level.)
Depending on how you decide to use it, the plugin will either report issues:
- In your web browser’s developer tools JavaScript console
- With your code directly in your editor
- Report issues with your CI (Continuous Integration) environment
Let’s take a more in-depth look at how you can setup and use eslint-plugin-jsx-a11y in your React project.
Ways to setup and use eslint-plugin-jsx-a11y
In the JavaScript console
By default, eslint-plugin-jsx-a11y comes pre-packaged with any app that you create via create-react-app. Without doing any more configuration or setup, the plugin will output issues and errors it finds directly to your browser’s developer tools JavaScript console.
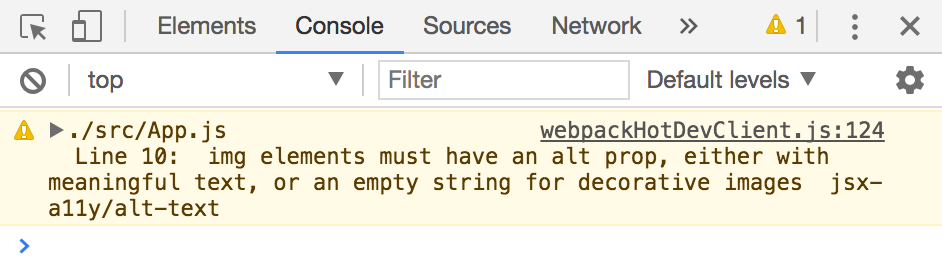
For example, if you add an img element in your HTML template without an alt attribute, you would see this message in your console:
Let’s look at an example of how we can go about seeing this message in your own browser console by setting up and creating a React app! Don’t worry, it’s only a few steps, then you’ll be up and running!
-
The only prerequisite to using
create-react-appis making sure to have the latest version of Node.js andnpminstalled. You can do this by downloading the official installer for your platform from NodeJS.org. -
After Node.js is installed, open your Terminal application to verify
npmis installed and ready to go:- If you’re on macOS, use Spotlight Search (magnifying glass icon in the top right) and type “Terminal” — click Enter to open the default Terminal app.
- For Windows 10, use Cortana Search (in the bottom left) and type “PowerShell” — click on “Windows PowerShell” to open this terminal app.
- If you’re running Ubuntu Linux, use the Dash (in the top left) and type “Terminal” — choose the default Terminal app.
Once you have your Terminal open, type and run the following command to verify
npmis installed:npm -vThis should return the current version number.
-
Next let’s use
npmto install thecreate-react-apputility. Type and run the following command:npm install -g create-react-appThis will install the
create-react-apputility “globally” so that you can use it to create a new React app in any directory on your computer. -
Now, let’s create a brand new React app using the
create-react-apputility. Let’s call it, “My Test App.” Type and run the following command:create-react-app my-test-appThis single command will go and grab everything required to get your React app up and running. It might take a minute of two, depending on the speed of your connection, so go grab a coffee or tea!
-
After all the files have been downloaded, change the current working directory of the Terminal to that of the new application folder which was just created.
cd my-test-app -
Let’s start the app to see if everything’s working so far! Type and run the following command to start the local development server:
npm startYou should see something like this pop up in your browser!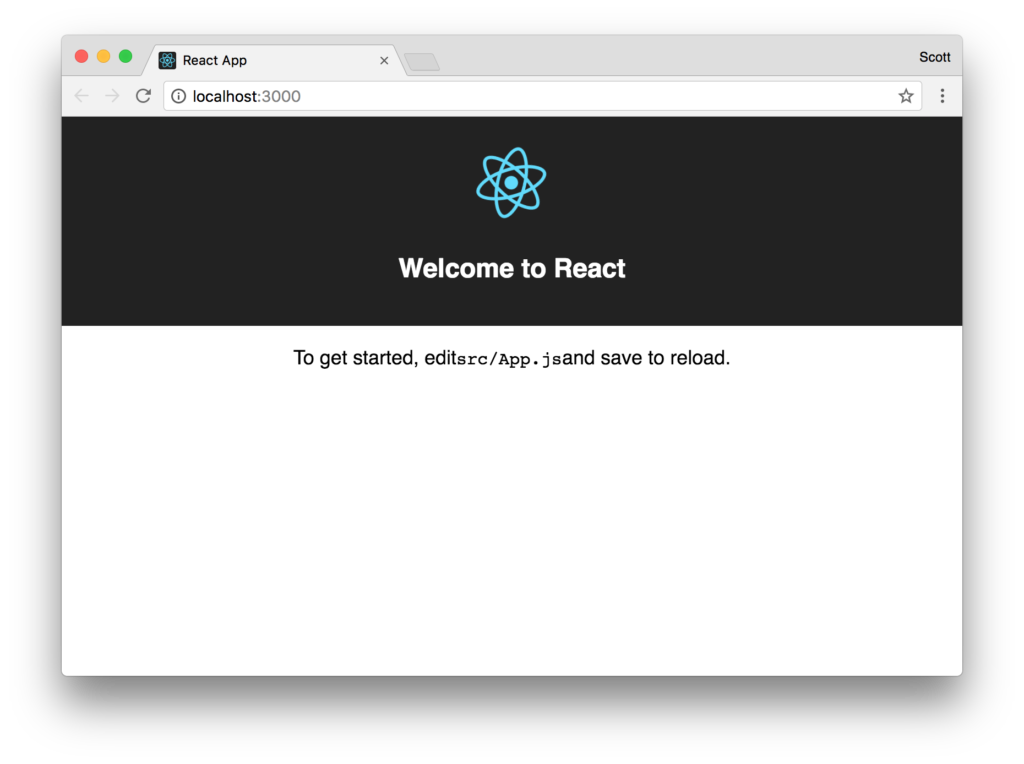
Great! Now that we have React up and running, let’s purposely cause an accessibility issue where eslint-plugin-jsx-a11y will send a message to the console, letting us know something’s not quite right.
We’ll be able to see this in action without adding any code. The default template has an image with an alt attribute, so we should be able to modify this line to see the warning message.
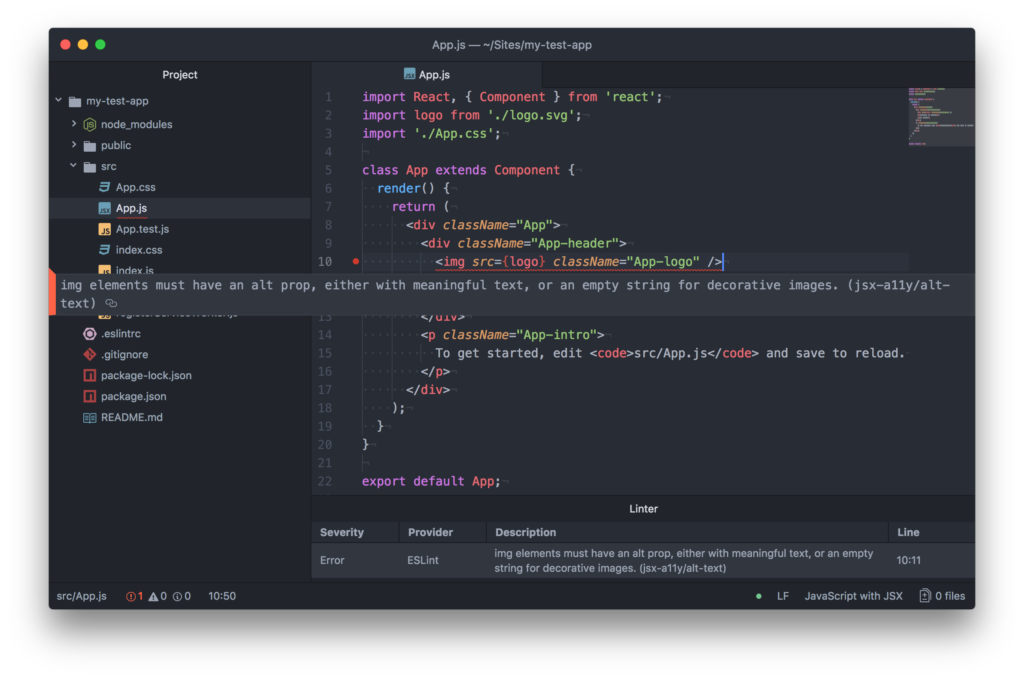
Open the my-test-app/src/App.js file in your text editor of choice, and review line 10. It should look like this:
<img src={logo} className="App-logo" alt="logo" />Go ahead and remove the alt attribute from this line and save the file. What do you think might happen next?
Let’s go back to the browser and open the developer tools JavaScript console. Reviewing the JavaScript console messages, you should see a warning that looks like this:
This looks like a helpful warning message to me! As you might know, all images need to have an alt attribute, even if it’s empty. Place the alt attribute back in the img element to fix up this warning!
Bonus: Not sure what to include in the alt attribute for your images? Check out The alt Decision Tree for some assistance!
In your code editor
Having these warnings and errors show up in your browser console is pretty great. However, wouldn’t it be nice to see these messages directly in your text editor, before testing your work in the browser?
We can set this up by following these few steps:
-
Install the ESLint package/extension for your code editor. Here’s some quick links for the more popular editing environments these days:
- If you’re using Atom, install the linter-eslint package.
- Sublime Text users can install the SublimeLinter-contrib-eslint package.
- For anyone using VS Code, install the ESLint extension.
-
Next we’ll need to use the Terminal app again to install a couple more packages using
npm. In order for your editor to output the warning/error messages, type and run the following command to install local copies of ESLint andeslint-plugin-jsx-a11y:npm install eslint eslint-plugin-jsx-a11y --save-devThis command will install these utilities for use with your current project only, and add entries to your
package.jsonfile to set these as development dependencies (used when we add ESLint as part of the CI strategy, but that’s later in the post.) -
With everything installed and ready to go, the last step is to add a new file to the project.
Open up the
my-test-appproject in your editor and create a new file in the root of the project directory called,.eslintrc(starting the file name with a dot character denotes a “hidden” file.) This file is read by your code editor’s ESLint package/extension which was installed in step 1 above.Open the
.eslintrcfile and add the following:{ "env": { "browser": true, "es6": true, "node": true }, "parserOptions": { "ecmaVersion": 6, "sourceType": "module" }, "plugins": [ "jsx-a11y" ], "extends": [ "plugin:jsx-a11y/recommended" ] }This configuration does a few things, including telling the editor that the destination environment is a web browser and the expected JavaScript version is ES6. It also sets
eslint-plugin-jsx-a11yto be used as an ESLint plugin, and extends the plugin to use the default recommended ruleset (see all Supported Rules) .
From here, your code editor should be able to display the same error message that we saw earlier in the browser console. Try it by going back to the my-test-app/src/App.js file, line 10, and remove the alt attribute. Depending on your code editor, you should be presented with some sort of visual indication of the issue.
Note: you may need to restart your editor in order for the new configuration file to be read.
As part of your CI strategy
You can, and should, include eslint-plugin-jsx-a11y as part of your CI (Continuous Integration) test strategy. In doing so, you’ll ensure there are no accessibility issues (that eslint-plugin-jsx-a11y can find) being introduced to your code repository.
Coming back to the missing alt attribute example, if someone committed a change with this issue present, the CI environment would catch this error and the commit would fail to merge. The setup described below essentially serves as a “last line of defense” to prevent any code issues from reaching your project’s repository.
Looking at the “My Test App” demo, let’s review the steps to incorporate eslint-plugin-jsx-a11y into Travis CI, a very popular CI service that works well with GitHub code repositories.
-
The first step is getting you project code into a GitHub repository. To accomplish this, you can follow along with the excellent guide, “Adding an existing project to GitHub using the command line.” This is required in order for Travis CI to access your project files and run the ESLint test we’ll specify in step 4.
-
Next, login to Travis CI via GitHub by going to https://travis-ci.org/ and clicking the green “Sign in with GitHub” button in the top right of the page. Allow Travis CI to access to your public repositories to continue.
-
Go to your Travis CI Profile page by clicking your name + image avatar link in the top right of the screen. Navigate down and toggle the “My Test App” repository toggle button in order to use this particular repository with Travis CI.

-
In order for Travis CI to run our ESLint test, we need to create a new file in our project.
Open up the
my-test-appproject in your editor and create a new file in the root of the project directory called,.travis.yml. Travis CI will read and then execute the instructions stored in this file on each new commit.Open the
.travis.ymlfile and add the following to it:language: node_js node_js: - "8" script: - eslint ./src/These particular instructions basically say, “Install and use Node.js version 8, install any dependencies via
npmlisted in thepackage.jsonfile, then run the commands listed in thescriptsection.”The
- eslint ./src/line will run ESLint on all the source files of the project.Note: you can also run this command locally in your Terminal to test your code before committing!
-
The last step is to commit the
.travis.ymlfile to your project’s GitHub repository. After this has been completed, point your web browser to the Travis CI project page to watch the output of the tests in real-time!
If you committed your project with the img element missing its alt attribute, you should see something like this at the bottom of the Travis CI output window (you should also receive an email with the notice):
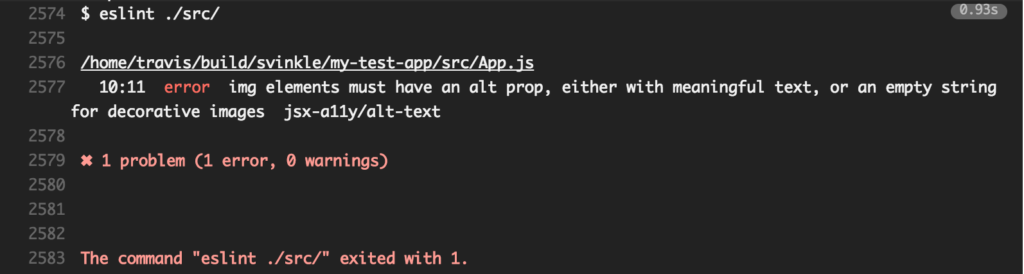
In order to fix this issue and have a successful build, place the alt attribute back onto the img element and recommit your file!
Wrapping up
These are just the high-level details on what eslint-plugin-jsx-a11y is and a few different ways of how you can incorporate it into your own projects to help ensure a more accessible user experience.
Of course, this in only one small part of making sure your React app is accessible. Other recommended methods to take is to run your app through an automated testing tool, such as the Chrome DevTools Audits panel. Not only will this check for accessibility issues, it also reports performance and best practices to help make your app the best it can be!
Finally, after fixing up any issues found with automated tools, always test your apps with assistive technology like a desktop or mobile screen reader! This is one of the best ways to find, debug, and fix any lingering accessibility issues in your app.
Just remember, we’re all responsible to ensure what we place out into the world is usable for as many people as possible, no matter their current location, browsing environment, device, or disability. With tools such as these and all the people in this great community who’re very knowledgeable and willing to help, there should be no doubt that your final product can be made accessible for all!